
In part 2 of Storage management best practices, we will explore the benefits of using Group Blob Store. Group Blob Store is a Sonatype Nexus Repository Pro-only feature.
What is a Group Blob Store?
A Group Blob Store is a collection of one or more blob stores. It provides an indirection between a repository and the actual blob stores that the binary files of components reside. A repository can use a blob store directly, but when that blob store fills up, it could require downtime to move the underlying storage device of the blob store to a bigger device. Alternatively, a repository can use a Group Blob Store. With a Group Blob Store, the number of member blob stores and the order of writing to these blob stores can be configured as needed by the business. You can dynamically add more member blob stores to a group as needed, you can also change the fill policy of how the member blob stores are written to.
What is a Default Blob Store?
Before we dive into the Group Blob Store, it is important to understand Sonatype Nexus Repository ships with a default blob store. This default blob store is created for ease of installation, so administrators can map any newly created repositories without having to worry about the underlying blob store.
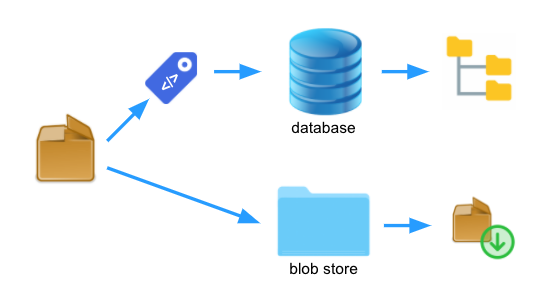
Using the default blob store is convenient, but it also comes with some management limitations. For example, when multiple repositories are mapped to the default blob store, it becomes more difficult to backup only the binaries of the highest importance and leaves the throwaway binaries out of the backup schedule. If the Sonatype Nexus Repository database is using the same storage device as the default blob store, filling up the storage device could lead to unexpected downtime because of the potential of database corruption.
How to make use of a Group Blob Store?
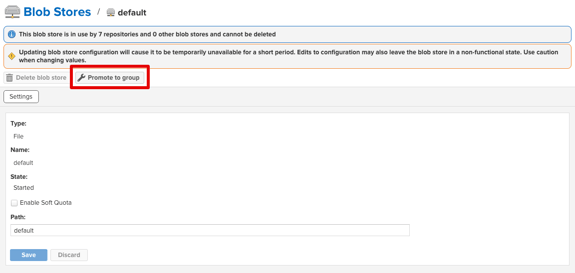
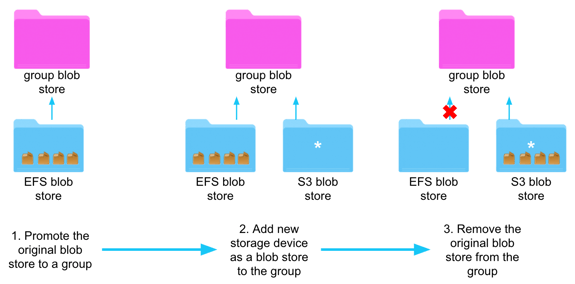
Many of our customers have relied on the default blob store for storing binaries of their components. To take advantage of Group Blob Store, the most straightforward way is to convert the default blob store to a group. You can find the "Promote to group" option when viewing the default blob store settings.
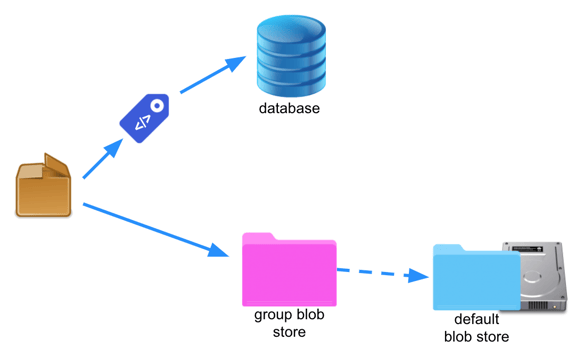
When you convert a blob store to a group, Sonatype Nexus Repository automatically creates a new Group Blob Store with the name of the original blob store "default," and rename the original blob store to default-promoted. This way, all existing repositories mapping to the default blob store will automatically continue to work through the new Group Blob Store. The actual storage is handled by the original blob store behind the Group Blob Store. At this point, the Group Blob Store has one member blob store.
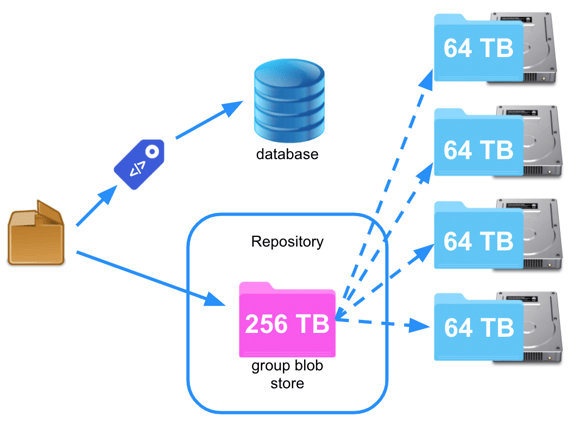
Once the Group Blob Store is configured, adding additional blob stores to the Group Blob Store is a matter of creating them and assigning them to the group. If the new blob stores are mapped to different storage devices, you have essentially increased the storage space of your blob stores available to the repositories currently utilizing the Group Blob Store. For example, creating a 256TB Group Blob Store with four 64TB blob stores can easily be accomplished.
Fill policy
In a Group Blob Store, you can choose the order to write binaries to the underlying blob stores. There are two available policies:
- Write to First - writes only to the blob store at the top of the member list
- Round Robin - writes to all member blob stores in a round-robin fashion
These two Fill Policies allow you to write new binary files to one blob store or evenly distribute new binaries to all member blob stores. Please note that the Fill Policy setting does not impact the read operation; binary files from all member blob stores can be read regardless of the Fill Policy setting.
Moving components from one blob store to another
If you are thinking of upgrading the storage device underlying a blob store, be it increasing the storage space available by introducing a bigger disk device, or decreasing the cost of the underlying storage by moving the files from EFS backed blob store to an S3 blob store. You can accomplish this by using the Remove a member from a blob store group task.
This task empties the blob store you like to remove by redistributing the binary files to other member blob stores of the same Group Blob Store. The exact way the binary files are distributed follows the Fill Policy setting of the Group Blob Store. When all the files are redistributed, the blob store will be disconnected and removed from the Group Blob Store. Because this is done via a Nexus Task, the move of the binary files happens in the background and it does require any downtime to deprecate a member blob store from a group.
You can find and create this task from the Administration>Tasks page in Sonatype Nexus Repository Pro.
Move components of a repository from one blob store to another
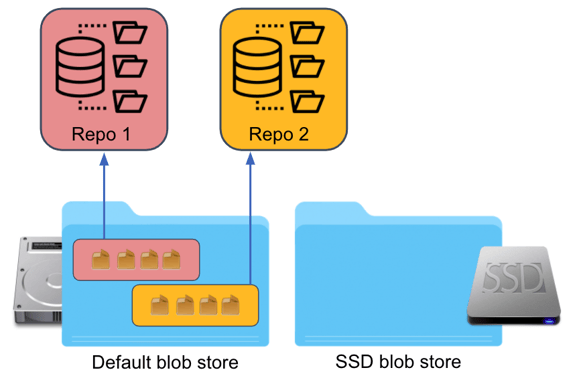
In the last section, the Remove a member from a blob store group task operates on the scope of a blob store by emptying out a blob store and removing it from the group. What if you only want to redistribute the binary files from one repository and move those files to another blob store? An example of how this can be beneficial would be to use a faster disk to access a repository, like a Docker format, because of the size of the binary files. To accomplish this, you can use the Change Repository Blob Store task.
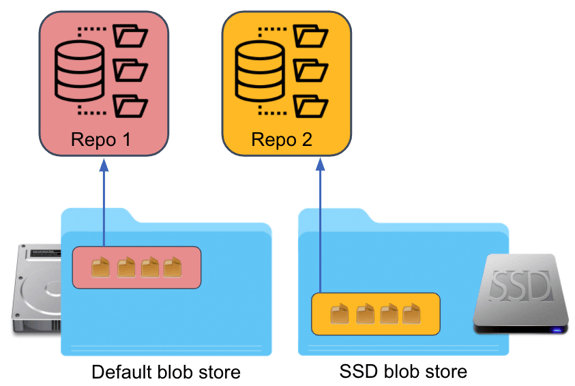
This task allows you to relocate the binary files of a repository to a different blob store. It progressively moves the binary files from the original blob store to the new blob store in the background. For example, you might have two repositories storing files to the default blob store. You later add an SSD backed blob store to your Sonatype Nexus Repository instance and would like to move the files belonging to Repo 2 to the new blob store.
Using the Change Repository Blob Store task, the existing binary files will be moved to the new blob store. Any new binary files being added to the repository will automatically be added to the new blob store. All these happen in the background via the running of the Nexus Task and no downtime is needed for this change to be implemented.
Conclusion
By using Group Blob Store, you can easily expand the storage space available to your existing repositories, or start creating new Group Blob Stores to manage your upcoming repository needs. This feature allows administrators to also control which member blob store to write to through the use of Fill Policy. With more space being made available, administrators can also choose to deprecate old blob stores via the use of Remove a member from a blob store group task. This task automatically empties the binary files from the target blob store and distributes the files to other member blob stores in the same group. Furthermore, an administrator can also use the Change Repository Blob Store task to separate the binary files of different repositories into different blob stores. This way, storage devices of different performance attributes can target the repositories appropriately.
For further Sonatype Nexus Repository release details and any questions you may have, please refer to the links below:
- Sonatype Nexus Repository 3.28 full release notes
- Documentation for Change Repo Blob Store
- Documentation for Group Deployment for npm
Nexus community, support, and quick-start guides at my.sonatype.com